
Add your Talvi AI bot to your website
Configure an embedded bot, install its generated HTML snippet, and test the visitor experience.
What you will achieve
Add a Talvi Embeddable AI Bot to your website so visitors can ask questions using its configured knowledge and mission. You need access to AI Agent Studio and permission to edit your website’s HTML or custom code settings.
1. Create and configure the bot
Follow Build a dataset and create an AI agent, choosing Talvi Embeddable AI Bot at Output.
Select Create embeddable bot credentials. Set the Widget title, Widget subtitle, Theme, and Welcome message, then enter Allowed origins. Select Save in the configuration dialog and finish with Save AI Agent. See AI Agent Studio’s embedded setup for the full sequence.
Use a mission and dataset suitable for the website’s intended audience. Visitors will interact with this bot through the site.
2. Allow the website and refine its appearance
Open the saved bot from AI Agent Studio → Custom AI Agents, then select View Config. Check its allowed origins and adjust the logo, welcome message, and opening state. Select Save Config when finished.
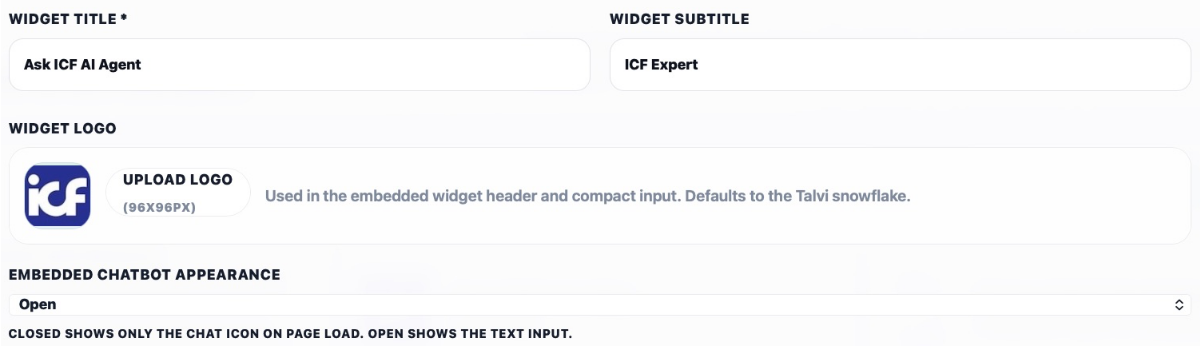
An origin identifies the website, not an individual page. For example, these dummy entries allow two separate website hostnames:
https://www.example.com
https://example.com
Do not append /support or another page path. If you test on a separate staging site, include its exact origin too. These are examples; enter your own website origins in Talvi.
3. Copy the generated HTML snippet
Find the embed snippet on the agent page, labelled Copy into the HTML page HEAD, and use its copy control. It includes the stylesheet, widget script, Markdown library, and the settings that connect the widget to this specific agent.
Use the generated snippet from your own agent for installation. The example below shows its structure with a placeholder base URL, agent ID, and publishable key. These real values will be visible in the generated snippet after you create the bot credentials and save the agent. Copy that generated snippet for your website; the placeholders below are for documentation only. YOUR_TALVI_BASE_URL means the full Talvi address, including https://, without a trailing slash, and must be replaced everywhere it appears.
<head>
  <!-- Your existing page metadata and styles remain here. -->

  <link rel="stylesheet"
        href="YOUR_TALVI_BASE_URL/rag-chat/js_modules/embed_ai_chat/embed_ai_chat.css">
  <script src="YOUR_TALVI_BASE_URL/rag-chat/js_modules/embed_ai_chat/embed_ai_chat.protected.js"></script>
  <script src="YOUR_TALVI_BASE_URL/rag-chat/js_external/marked.min.js"></script>
  <script>
    (function () {
      function initialiseTalviChat() {
        if (window.embeddedChatInstance) return;
        if (typeof EmbeddedChat !== 'function') {
          console.error('Talvi EmbeddedChat script has not loaded.');
          return;
        }

        window.embeddedChatInstance = new EmbeddedChat({
          apiBaseUrl: 'YOUR_TALVI_BASE_URL',
          publishableKey: 'YOUR_PUBLISHABLE_WIDGET_KEY',
          aiAgentId: 'YOUR_AI_AGENT_ID',
          botFlavour: 'chat_bot'
        });
      }

      if (document.readyState === 'loading') {
        document.addEventListener('DOMContentLoaded', initialiseTalviChat);
      } else {
        initialiseTalviChat();
      }
    })();
  </script>
</head>
| Setting | Purpose |
|---|---|
| Stylesheet and script addresses | Load the widget’s appearance, behaviour, and Markdown support from your Talvi deployment. |
YOUR_TALVI_BASE_URL / apiBaseUrl |
Connects the widget to your Talvi deployment, using the address in the generated snippet. |
publishableKey |
Identifies the public widget configuration. It is intended to appear in the website’s browser code. |
aiAgentId |
Selects the saved AI agent. Keep the ID and key from the same generated snippet together. |
botFlavour |
Selects the bot type; the standard chatbot example uses chat_bot. Preserve your generated value. |
Use only the publishable widget key here. Private MCP access keys and private app integration credentials do not belong in website HTML.
4. Add it to your website
Paste the generated snippet inside the existing <head> element on each page where the bot should appear. Do not add a second <head> element; the example shows its position in a page.
For a website builder or CMS, use a custom-code facility that supports scripts in the page head. A shared header template can install the widget across the site. If you only want it on selected pages, use page-specific code settings. Ask your web administrator to add it if your editor removes script tags.
Include the snippet once per page and preserve its script order. Save or publish the website changes using your normal website workflow.
5. Test as a visitor
Open a page on an allowed website origin and check:
- The chat icon or open input appears according to the saved opening state.
- The title, logo, and welcome message are correct.
- A question grounded in the bot’s dataset produces a relevant answer.
- Any configured Custom CTA Actions lead to the intended pages.
Review View Chat History and View Logs on the saved agent if you need to investigate a conversation. You can also generate reports after visitors begin using it.
If the bot does not appear or connect
Check that the agent was saved, credentials were created, and the copied snippet contains real generated values rather than placeholders. Confirm that Allowed origins matches the page’s scheme, hostname, and port exactly, including any www difference.
If the widget script cannot load, ask your web administrator to check whether the website editor removed it or the site’s content security policy blocks the required Talvi resources or connection. Use the deployment address supplied in the generated snippet and reload the page after correcting the configuration.
Result: visitors can use your configured Talvi AI bot directly on the selected website pages.
See also: AI Agent Studio · Configure an embedded AI Agent.